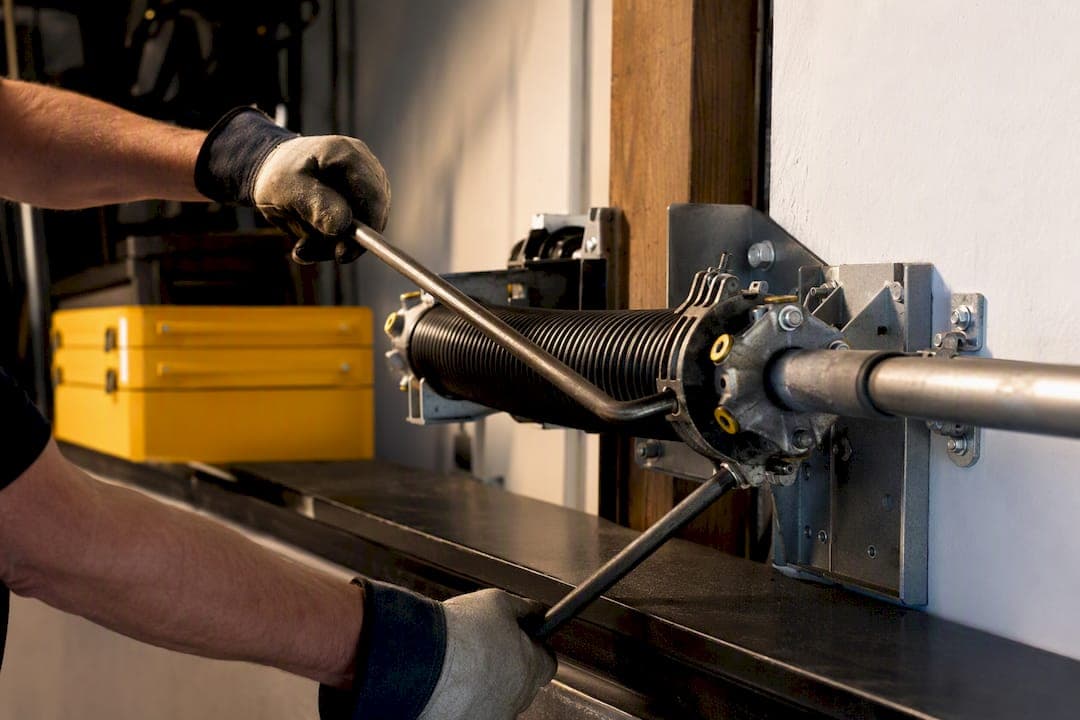
If you have the right hardened winding bars, the correct replacement spring, and steady hands, torsion spring replacement is a doable Saturday project. If any of those pieces is missing, or the spring is already broken, stop and call a pro. Right now: leave the door closed, cut power to the opener, and don't touch the winding cones until you're ready to follow every safety step below.
TL;DR:
- Using the wrong tools, such as screwdrivers or rebar, greatly increases injury risk, while proper hardened steel winding bars are essential for safe removal and installation.
- Ensure both springs are measured accurately in wire size, inside diameter, length, and winding direction to avoid early failure or imbalance.
- Replacing only one spring causes imbalance and shortens the lifespan of both, making simultaneous replacement the best option for longevity.
- If the spring is visibly broken, rusted, or the door cannot be moved manually, it is safer and more effective to call a professional rather than attempt DIY repair.
- Professional replacement typically costs more upfront but guarantees safety, proper balance, and often same-day service, especially when the job involves handling dangerous stored energy.
Table of Contents
- What Makes Torsion Spring Replacement So Dangerous?
- What Tools And Parts Do You Actually Need?
- How Do You Choose The Right Replacement Spring?
- How Do You Replace A Torsion Spring Step By Step?
- How Do You Test A New Spring Installation?
- How Long Do New Torsion Springs Last With Proper Care?
- When Should You Call A Professional Instead?
- The Real Question Isn't Skill, It's Judgment
- Ready To Skip The Winding Bars Entirely?
- Sources
- FAQ
What Makes Torsion Spring Replacement So Dangerous?
A torsion spring on a standard residential door stores enough torque to lift a substantial amount of dead weight. That energy doesn't go anywhere when the door is sitting still and closed. It's wound into the spring the entire time, waiting for a release point, which is exactly why so many homeowners get hurt on doors that "weren't even moving" when the spring let go. Research on winding-tool hazards points to this stored-energy misunderstanding as one of the biggest reasons DIY injuries happen: people treat a quiet, closed door like it's safe to work on.
The injuries aren't hypothetical. A documented case series tracked seven patients with open-globe eye injuries caused by high-velocity fragments from failed garage door springs, with outcomes including retinal detachment and, in the worst cases, loss of the eye entirely. Springs don't just snap. They whip, and whatever's in the blast radius, fingers, face, tools, takes the hit.
Here's what that means for you, in practical terms:
- Never run the garage door opener when you suspect a broken spring. It puts massive strain on the opener and can send the door crashing down.
- Never use screwdrivers, rebar, or "whatever's in the garage" as winding bars. Only hardened steel bars sized to the winding cone will hold under that torque.
- Never prop the door open with a 2x4 or similar as a "temporary fix" while you figure things out. If the spring gives, that prop does nothing.
- Keep a clear zone. Kids, pets, and anyone not actively assisting should be well outside the door's swing radius.
- Wear eye protection and gloves every time you're near a wound spring, even just to inspect it.
- Work with a second person for winding and unwinding. This isn't a one-person job.
Pro Tip: If a spring has already snapped, don't try to "relieve" the tension on the remaining one yourself. Both springs work as a matched pair, and an unbalanced door under partial tension is more unpredictable, not less.
If you're staring at a spring that's already visibly separated, corroded through, or if the door won't budge even an inch by hand, that's your signal to call a professional rather than push forward.
What Tools And Parts Do You Actually Need?
Buying the wrong tool here isn't a minor inconvenience, it's how people end up in the ER. Torsion spring work has a short, non-negotiable tool list, and every item on it exists because something less specialized has failed on someone before you.
Tools:
- Two hardened steel winding bars, sized to match your spring's winding cone (typically ½ inch square stock, but confirm against your cone).
- A ratchet and socket set for the set screws and mounting bolts.
- Vise grips or locking C-clamps to secure the door track during removal.
- A sturdy ladder rated for your weight plus tool weight.
- A tape measure and set of digital calipers for measuring wire size and inside diameter.
- Eye protection and work gloves, non-negotiable, not optional accessories.
Parts:
- Matching torsion springs, correct on inside diameter, wire size, length, and wind direction.
- New cables if the old ones show fraying, rust, or kinks.
- Drums, set screws, and mounting brackets if the originals are worn or damaged.
Screwdrivers and rebar show up constantly as substitutes because they're already sitting in a garage, but they're not hardened for this kind of torque. A bar that flexes or slips under load doesn't just fail quietly, it releases stored energy all at once, which is one of the primary causes of serious DIY spring injuries.
Expect to spend $30 to $60 on a pair of quality winding bars if you don't already own them, and $50 to $130 per spring depending on size and cycle rating. Buy springs from a garage door supplier who can match your measurements exactly, not a generic hardware store rack. A spring that's close but not exact will bind, wear unevenly, or fail early.
How Do You Choose The Right Replacement Spring?
Getting the measurements wrong is the single most common reason a DIY torsion spring replacement fails, either the door won't balance right, or the new spring burns out in a fraction of its rated life. Four numbers matter, and you need all four before you order anything.
What to measure on your existing spring:
- Wire size: Use calipers to measure wire diameter, then cross-reference a wire gauge chart. A difference of even a few thousandths of an inch changes the spring's lifting capacity significantly.
- Inside diameter: Measure across the inside of the coil, not the outside.
- Overall length: Measure the wound section only, end to end.
- Wind direction: Face the spring from the center of the door. A right-wound spring's coils angle one direction, left-wound the opposite. Springs are mounted on opposite sides for a reason, get this backwards and nothing will fit.
Door weight determines spring strength, so it matters just as much as the measurements above. If you don't have a way to weigh the door directly, you can estimate it from door specs using panel material and dimensions, or disconnect the opener and use a bathroom scale under one corner while a helper lifts the other side slightly to isolate the load.
Pro Tip: Write your measurements down before you leave the garage. "I'll remember it" is how people end up back at the supplier a second time with the wrong spring in hand.
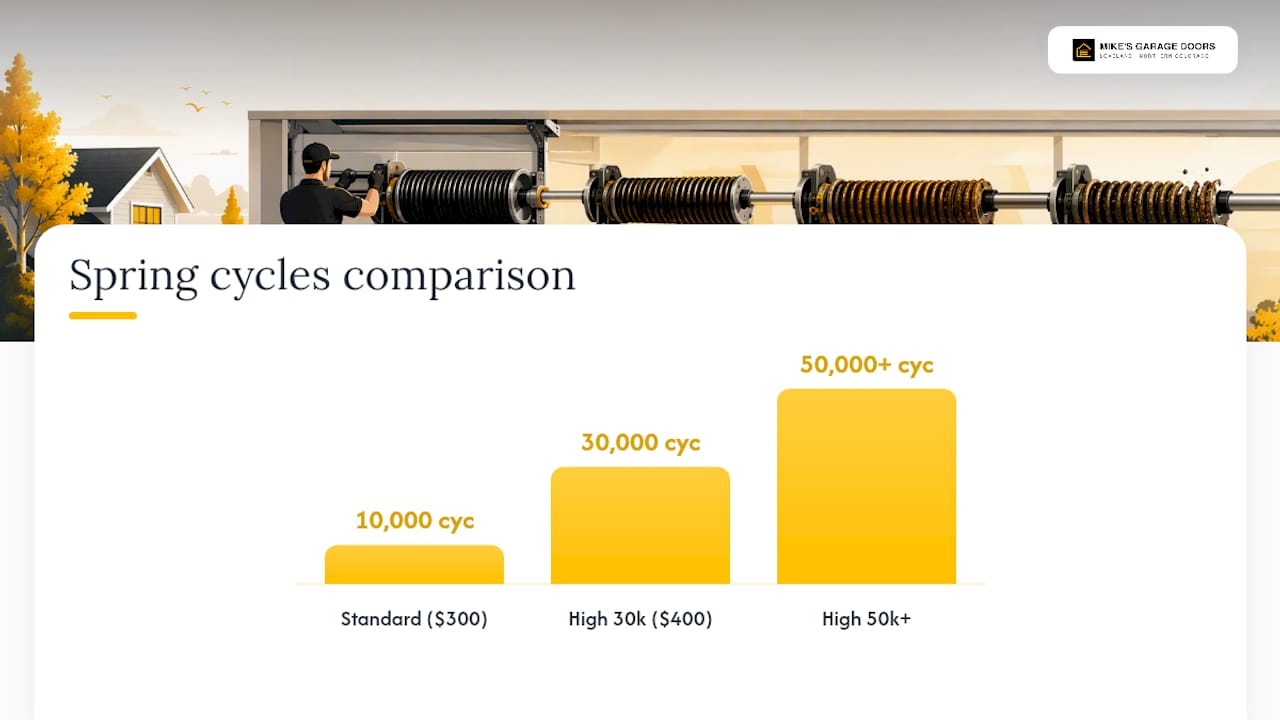
Standard torsion springs are rated for 10,000 cycles, about seven to ten years of typical use. High-cycle springs, rated 25,000 to 50,000-plus cycles, cost more upfront but often work out cheaper per cycle. A $300 standard spring at 10,000 cycles runs about $0.03 per cycle. A $400 high-cycle spring at 30,000 cycles runs closer to $0.0133 per cycle, less than half. If your door opens and closes multiple times a day, that math favors the upgrade.
Replace both springs at the same time, even if only one has broken. Paired springs age together, and running one worn spring against one brand-new one throws off the balance and shortens the new spring's life. Technicians who do this work daily follow the same rule for the same reason: it prevents a callback in six months for the second spring. Compare torsion and extension setups in our guide to garage door spring types if you're unsure which system your door uses.
How Do You Replace A Torsion Spring Step By Step?
This is the part where careful, methodical work pays off, and rushing costs you. Read through the entire sequence once before you start turning anything.
Before you touch a spring:
- Close the garage door fully and unplug the opener at the outlet, not just at the wall switch.
- Clamp the door to the track with a locking C-clamp just above one of the rollers, on both sides, to prevent the door from moving.
- Clear the area of anyone not directly assisting, and put on eye protection and gloves.
- Confirm you have a second person available for the winding steps. Do not attempt this solo.
Removing the old springs:
- Mark the torsion shaft and both drums with a permanent marker or paint pen before removing anything, so the drums go back in the exact same position.
- Loosen the set screws on the stationary cone at the center bracket, using a winding bar fully seated in the cone to control any residual tension as you loosen.
- Once the set screws are out, unwind the spring in quarter-turn increments using two bars, alternating so one bar always stays seated in the cone while you reposition the other.
- Remove the cable drums, noting exactly how the cable was routed before you pull it free.
- Slide the old spring off the shaft.
Installing the new springs:
- Slide the new spring onto the shaft in the same position as the old one, confirming wind direction matches the side of the door you're working on.
- Reattach the cable drum in its marked position and thread the cable exactly as it came out.
- Tighten the stationary cone's set screws against the center bracket firmly, this end isn't moving, so get it locked down before winding.
Winding the new springs:
- Insert one winding bar fully into the winding cone. A bar that isn't fully seated is the number one reason bars slip under load.
- Turn the bar to create your first quarter turn, then insert the second bar into the next hole to hold that position while you remove the first bar and reset it for the next turn.
- Repeat this alternating two-bar sequence, counting quarter turns carefully. Most residential doors need somewhere between 7 and 9 full turns depending on door height and spring specs, but confirm the exact count from your spring's documentation or the door manufacturer.
- Keep a bar seated and in your grip at all times during this process. Never let go of a wound spring with no bar in place.
- Once you reach the correct turn count, hold the final position with one bar while tightening the winding cone's set screws to spec, typically snug plus an additional quarter turn past hand-tight, but check your spring's instructions.
- Repeat the entire winding sequence on the second spring.
Watch for a bar that feels like it's slipping in the cone rather than gripping cleanly. That's your cue to stop, reseat it fully, and reassess before continuing. If at any point the winding feels uncontrollable, if a bar won't seat properly, if you discover corrosion or damage you didn't expect on the shaft or brackets, or if the replacement spring doesn't match despite your measurements, stop the job and call a professional. There's no shame in handing off a job that's turned into something outside your comfort zone, and pushing through that moment is exactly how injuries happen.
Pro Tip: Keep both winding bars in the cone holes at all times except during the brief moment you're repositioning one. That split second of "just one bar holding" is when most slips happen.
How Do You Test A New Spring Installation?
Once both springs are wound and the set screws are torqued down, remove the C-clamps and test the door by hand before you plug the opener back in.
Lift the door about halfway and let go. A properly balanced door should stay roughly in place, not slam down and not shoot upward. If it drops, the springs are wound too loosely. If it flies up on its own, they're wound too tight. Either case means readjusting the turn count on both springs before you move forward.
Run through this checklist once the manual balance test passes:
- Reconnect the opener and test a full open/close cycle, watching for grinding, jerking, or uneven movement.
- Test the auto-reverse safety feature by placing a block of wood on the ground where the door closes. It should reverse immediately on contact, never continue closing.
- Confirm the photo-eye sensors near the bottom of the tracks are aligned and triggering correctly.
- Check that cables are seated evenly in both drums with no slack or bunching.
- Recheck set screw torque after the first few cycles, they can settle slightly as the spring seats in.
Keep an eye on the door for the first 24 to 48 hours of normal use. A slight settling sound or minor adjustment need in that window is normal. A door that starts drifting off-balance, or cables that visibly loosen, means something wasn't torqued or wound quite right, and it's worth revisiting before it becomes a bigger issue. For a deeper look at fine-tuning tension after installation, our spring tension adjustment guide walks through the finer points.
How Long Do New Torsion Springs Last With Proper Care?
A well-maintained torsion spring typically lasts 7 to 10 years or about 10,000 cycles, whichever comes first for your household's usage pattern. Maintenance won't make a spring immortal, but it noticeably slows the wear that shortens that lifespan.
Lubricate the springs every six months with a lithium-based garage door lubricant, never standard household oil or WD-40, which attracts dust and grit rather than repelling it. Apply it along the full length of the coils while the door is at rest, then run the door a few times to work it in.
Inspect the springs visually every few months for:
- Rust forming on the coils, especially if your garage sees humidity or road salt exposure.
- Visible gaps between coils that weren't there originally.
- Uneven coil spacing on one spring compared to the other.
- Any coil that looks stretched, flattened, or discolored compared to the rest.
If you're using the door multiple times a day, run the cost-per-cycle math from the choosing-spring math above again at replacement time. A standard spring at roughly $0.03 per cycle versus a high-cycle spring closer to $0.0133 per cycle adds up fast for a household or business opening the door 8 to 10 times daily. Heat, humidity, and infrequent lubrication all shorten spring life faster than the baseline estimate, so a garage exposed to a lot of temperature swings deserves more frequent inspection, not less.
When Should You Call A Professional Instead?
Some situations call for stepping back, no matter how many tools you own. If you can't control the winding bars confidently, if the door won't move even slightly by hand, if you find corrosion or damage beyond the spring itself, or if you're just not sure the numbers you measured are right, that's the point to call in a professional rather than guess. Industry guidance is consistent on this: a trained technician typically completes a full spring replacement, including balancing and safety testing, in under an hour.
On a service call, expect the technician to replace both springs as a pair, inspect the cables and drums for wear, balance the door, and back the work with a warranty. Mikes garage doors Loveland colorado completes about 90% of repairs the same day they're called in, which matters when a broken spring means the door won't safely open at all.
Before the visit, it helps to:
- Take a few photos of the spring and the area around the winding cones.
- Note how old the door and opener are, and whether either spring has been replaced before.
- Ask for an upfront estimate over the phone rather than waiting for a surprise on the invoice.
Pro Tip: If you're a veteran, ask about the discount when you call. Mikes garage doors Loveland colorado offers 10% off for veterans as part of its commitment to the local community.
The Real Question Isn't Skill, It's Judgment
Most articles on this topic treat torsion spring replacement as a binary: either you're handy enough to do it, or you're not. That framing misses the actual decision point. The mechanical skill required here isn't that rare, plenty of homeowners can turn a wrench and follow a numbered sequence. What separates a safe DIY job from a dangerous one is whether you recognize the moment to stop.
The conventional advice tends to either scare people off entirely or hand them a checklist and wish them luck. Neither is honest. The winding bars, the measurements, the turn counts, none of that is the hard part. The hard part is admitting mid-project that a bar isn't seating right, or that the spring you bought doesn't quite match, and putting the tools down instead of pushing through.
If you're doing this once, the cost-per-cycle math on high-cycle springs might not sway you much. If your door runs multiple times a day, it should. That's the kind of decision worth making with real numbers instead of a gut feeling.
— Eddie
Ready To Skip The Winding Bars Entirely?
If reading through the winding sequence made you less, not more, confident about tackling this yourself, that instinct is worth trusting, as explained in Avoiding Common Pitfalls: The Challenges of DIY Door Replacement. Mikes garage doors Loveland colorado handles torsion spring replacement start to finish, both springs, correct cycle rating for your household's use, full balance testing, backed by a warranty, with an honest phone estimate before anyone shows up at your door.

What makes this the better call for a lot of homeowners isn't just avoiding the risk, it's the speed. About 90% of repairs get done the same day, so a broken spring doesn't mean days of a door that won't open. Whether you're dealing with a snapped spring right now or you're planning ahead for an upgrade to high-cycle springs, request a quote for garage door services in Loveland and Northern Colorado, and get a real number before you decide anything.
Sources
- PMC: case series of ocular injuries from snapped springs
- UNL research on torque and DIY hazards
- GarageDoorGuide: High cycle torsion springs explainer
- Advanced Door: 'Can you replace garage door springs yourself?'
FAQ
How much does it cost to replace a torsion spring?
Parts alone typically run $50 to $130 per spring depending on size and cycle rating, plus $30 to $60 for winding bars if you don't already own a pair. A professional replacement, including both springs, balancing, and a warranty, costs more upfront but eliminates the tool investment and the risk.
Can I replace a garage door torsion spring myself?
Yes, if you have hardened winding bars, the correct replacement spring matched to your exact measurements, and a second person to assist. If the spring is already broken, the door won't move by hand, or you're unsure about any measurement, call a professional instead.
How do I figure out what torsion spring I need?
Measure wire size with calipers, inside diameter across the coil, overall wound length, and wind direction, then match those against your door's actual weight. Getting any one of these wrong leads to a spring that binds, wears unevenly, or fails early.
How long does a torsion spring typically last?
A standard torsion spring lasts about 7 to 10 years or roughly 10,000 cycles, while high-cycle springs rated 25,000 to 50,000-plus cycles last considerably longer and often cost less per cycle overall.